Tuesday, May 17, 2011

Knipex pliers set from Europe

When my parents visited us during last Christmas, my dad brought me some presents in the form of European tools. One of these gifts was a set of Knipex pliers.

Knippex pliers

This is a great set of pliers, German made, of a very high quality. I have been using these pliers more and more for electric work, cutting cables, plumbing, automotive and more, to the point that my Craftsman set is starting to get dusty.

My dad told me he uses the cutting pliers (center in above picture) for cutting almost everything including nails and other metals. I can confirm these are strong enough for this type of heavy duty work although I am going to take care of them by not pushing them to the limit. Here is a closer look to the cutting pliers:

Cutting pliers

A few weeks after I got this gift, I saw this same kit selling at Lowe's so if you are interested in getting these you know where to get them from. Amazon also sells some good sets of Knipex tools.

Saturday, May 14, 2011

Calcium deposits on bathroom faucet

We installed a new bathroom faucet a few months ago, and it's been showing lots of calcium deposits around the handles, you know how hard is San Diego water even with a water softener. We have tried some products to remove the calcium, but nothing can really clean it since the calcium is stuck and one can't scrub due to the limited access to the area so I decided it was time to remove the handles and see what was going on.

Calcium deposits on right handle

Removed the handles and realized the right one, which is cold water, had a lot of rust and calcium. The left one was ok, so I am starting to think it's possible this faucet is getting water that hasn't gone through the softener or the softener is not softening. I'll check that later.

Right handle with calcium

Anyway, I used a product to remove calcium and rust and let it sit for a few minutes and scrubbed until all calcium was removed.

Calcium has been removed

Calcium has been removed
Then I used some marine grade oil for stopping corrosion, this will create a layer of grease that will avoid rust in the valve area, so it can be removed easily if the valve needs to be replaced in the future. Not sure if the oil will have any effect on the calcium but just in case I have sprayed the handle and valve, it can't hurt.

Adding oil to stop corrosion

Time to replace the handles and try the faucet. It all works ok, and the handles are turning smoother now.


Faucet looks like new

And that's it for today.

Installing a gate spring

Our house has a gate on the right side of the house, and the gate has a tendency to open itself and bang all night. Time for installing a spring that keeps the gate closed.

I bought the gate spring at Home Depot and followed the instructions which are very straightforward. First I had to clean all the spider webs and kill some really big spiders, this is a gate we don't use so all the spiders in the neighborhood are squatting in here.

Once the area was clean, I marked the holes with a pencil using the spring as a template, then drilled four 7/64 holes. To finish the installation, I screwed the spring to both the jam and door, like this:

Screwing the gate spring


Once finished, one can adjust the tension by screwing the nut in the top of the spring:

Adjusting spring tension


Once adjusted, the door stays closed all the time. Nice improvement for $10.

Final look of spring from inside

The spring is on the inside so it does not compromise the house's curb appeal. Actually I might buy another one for the other gate on the left side.

Friday, May 13, 2011

Installing a new door knob or door lever

Finally, I got a chance to try my new Dewalt DC925. I also figured out about the transmission problem. According to some folks in different forums in which I have absolute confidence (like DEWALTOwnersGroup.Com), this is a known problem of these drills. The new DCD950 with a forward-reverse gear shift (opposed to a left-to-right) does not have that problem. Anyway, I can live with that as long as the drill performs well.

So back to the project, I decided I would try the drill by installing a new door lever. Our choice for all bedrooms in the house has been the Schlage Accent series in Oil-Rubbed Bronze.

The first step is to mark the location where the hole for striker will be drilled. I do this by looking at the striker plate on the door jam. Once the location of the hole is marked, I screw the Door Lock Installation Kit to the door with a couple of small screws.

Door Lock Installation Kit

I bought this kit from Harbor Freight, have used it for installing six doors so far and it has worked great every single time. Once again, thanks HFT!

Once the kit is installed, drilling is what comes next. First I use the big saw and drill a big hole for the lever mechanism. When finished I get the small saw and drill the hole for the strike.

Holes for door lever

While doing this, I like to use a bit of cutting oil otherwise the saws get real hot due to the friction, the drawback to this is the gooey paste that comes out when the oil mixes with the sawdust.
When I was in the middle of the drilling job, I realized the drill bit was wobbling so I took a closer look at it.

Drill Bit included in Door Lock Kit

I guess what happened is that after drilling into six doors, the bit loosened from its base. Fortunately there is an Allen screw that allows for tightening the drill bit, so I used the Allen wrench seen in the picture and let the drill bit perfectly tightened.

After the two holes are done, I remove the kit and clean the area with a cloth. Also notice the marks in the picture below.

Door ready for lever

Now the door is ready to install the door knob, door lever or whatever we want. This is what it looks like after installed:

Door lever installed

 The next step, which will be shown soon, is to paint the door.


Saturday, May 7, 2011

New tool: Long Nose Pliers

We went to the park this afternoon and my wife found this laying on the lawn:

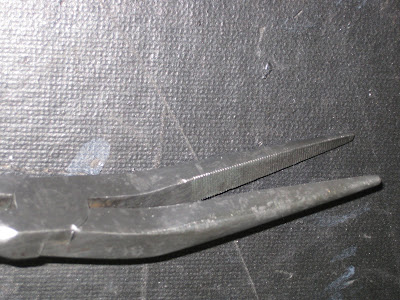
Mac Tools Long Nose Pliers

They didn't look like this at all, they were covered in a layer of rust from the weather, they probably sat there for one or two weeks, and they looked like a tool you would discard immediately. Anyway, I wanted to take them home to see if I could restore them.

After letting them soak in "Evapo-Rust" for a few hours and some scrubbing later, they look almost like new. I could even see the laser-etched logo (which I removed after some more scrubbing) and wow! it turns out they are made by Mac Tools so they are probably a $40 pair of pliers.


They definitely look like a good quality tool, and for what I paid, I can't complain!


Happy Mother's Day!

Friday, May 6, 2011

How to replace transmission in a Dewalt Hammer Drill

Just received the new transmission for the Dewalt DC925, and I am about to get it installed.

The first thing I do is to remove the chuck and spindle assembly, so I unscrew the four Torx-10 screws:

Removing screws

By doing this I have access to the transmission. I take it out and compare to the new transmission:

Old transmission (left), new transmission (right)


They look identical, so it's time to get the new one installed. Before I do that, I decide to remove the lithium grease that I added last week to the spindle and use instead a silicon grease that came with my SDS Rotary Hammer which seems more appropriate for this.


Now it's time to attach the spindle assembly with the new transmission to the motor:

Closeup of the motor shaft
Now in order to get the transmission mounted to the motor shaft, I have to slightly press the drill switch so the shaft turns and it engages the transmission gears. Then I put the screws back and the drill is ready for a test.

Unfortunately the problem when changing gears is still there, so I am starting to think that it is not a problem but a "feature" of the drill. I will have to investigate that. The good thing is I have an extra Dewalt transmission just in case.

Thursday, May 5, 2011

This To That

This is a website that I use quite often and I consider it should be shared with others who like to glue stuff, or who use glue to fix almost everything - like me.

The website is called This To That and it recommends what type of glue to use for getting two materials glued together, for example if you want to get wood glued to metal, it'll tell you what you need.


Take a look by clicking here. And don't forget to add it to your bookmarks!

Wednesday, May 4, 2011

Adding a filter to the irrigation system

When we moved into our new home, there was an irrigation system installed. Although it was not properly maintained or installed, it saved us from buying all the stuff to get it working. One of the things I recently noticed is that some of the old button drippers were clogged with dirt. I also noticed the system did have a water pressure regulator but did not have any filter so I stopped by Home Depot and bought one.

Take a look at the way it is now:


To the right of the valve there is the filter, then the pressure regulator and then the adaptor from 3/4 PVC pipe to the 1/2 poly tubing which is what carries the water to the garden.

Installing this water filter is straightforward, the water filter has 3/4 inch MPT-FPT connectors so I just used some Teflon tape on the threads and screw it in. I had to cut some of the polytube to fit the filter but that was it. Here I am adding some Teflon tape to the threads of one of the adapters:


I like using Teflon tape even on garden hoses because not only prevents leaking but it also helps keeping corrosion out and makes it easier to unscrew when you need to replace something.

Back to the filter, the nice feature is that you can easily take out the filter mesh to check for dirt and clean it up:


If dirty, I put it under the sink to clean it up, and put it back in and that's it for this project!

Tuesday, May 3, 2011

Tip to reuse paint tray

This is what I do when I am finished painting with a paint roll. I think it only works with latex-based paint. I leave some paint on the tray, just enough to create a thin film of paint once it dries. After one day of drying, I can peel off most of the paint, like shown in the picture below.


If there is some paint left behind after the peeling, you can still remove it by scratching, it'll come out very easily. Paint needs to be completely dry for this trick to work. I also use this for other paint recipients like plastic cups, etc.

This is what it looks like when it's ready to use again:


Now, I wouldn't use this paint tray with a different type of paint but if you're going to be using the same paint, it should be all right.

Monday, May 2, 2011

Project #27.518: Painting the fence

A couple of weeks ago, I realized my fence needed some help. Actually I am not sure if the fence was stained, painted or what product they used before, but whatever it was, it looked in bad shape. The fence had obvious signs of "paint" peeling away and some of the fence boards were already naked so before the situation got worse I decided to take action.

The first thing I did is a little research to figure out what product I needed. Home Depot provided all the information via one of these touch-screen kiosks in the paint department. According to the guy in the video, the best protection for wood is a fence/deck stain. I'll take his word for granted. There are three different stains, transparent, semi-transparent and solid, being the latter the one that provides the better protection (the label claims 25 years warranty on fences). The fence was already "painted" so I needed to hide the defects of that paint job like paint dripping marks and such. Add to this that I don't want to repeat this work again in two or three years. The result is that I went for the "solid stain": maximum durability and homogeneous color.

As always, my wife chose the color: Brick.

This is the stain that we chose

I already had some of the painting supplies from when I painted the house, so I only needed some rollers, this time I went for quality and chose the Purdy which are MADE IN USA :)


Here is the procedure I followed for staining the fence.

Preparation
  • If your fence is full of spiderwebs, bird nests, and such, use a broom to remove these.
  • Spray the fence with water, using a garden hose or water sprayer.
  • Then wipe it off using a cloth. This will remove all dirt.
  • Once dry, it's ready for the stain.
Here I am spraying the fence

Staining
  • I applied the stain with the roller horizontally, when trying to do this vertically I noticed some boards were out of alignment so it was easier to do it horizontally.
  • Stained around 10 to 15 boards, then waited to dry and repeated with a second coat.
  • Then used a 2" paint brush to finish the spots where the roller didn't work, like top and sides of the boards.
Painting the fence horizontally
I am still trying to figure out how to do the other side of the fence, since it's on the neighbor's property.

And this is the result:
Fence is ready to take abuse from San Diego sun

Sunday, May 1, 2011

New Hammer Drill

Last week I bought myself a new hammer drill. One guy from Fallbrook, CA was selling this drill for 40 bucks and I went ahead and took wife and kids and drove for 1 hour to pick it up. It was worth the trip, as it's a Dewalt DC925 that is in good condition and will come in handy for masonry work.


We also took the chance to eat some burgers at Nessy Burger which is a very nice place with a town-like feeling and nice people. By the way the burgers are very good.

The first thing I do when I buy something used is clean it up thoroughly. I did this with a grease remover called Oil Eater. Then I opened it up to check the status of the brushes, motor and transmission. The brushes were in very good condition, looked like almost new so it seemed like the drill was not used too often. And the motor was in perfect condition too. I used some compressed air to get dust out of the drill enclosure, motor and other parts, then added some lithium grease to all the drill gears as a maintenance. When doing this, don't add too much grease, just enough for lubrication.

Only thing I am suspicious about the drill is the transmission, sometimes it gets stuck between gears. So I ordered a new transmission and will be replacing it next week. Then it'll be ready to rock and roll.

One of the things I like about this drill, besides its awesome power, is the fact that it comes with an all-metal chuck. The drill is definitely heavier than the typical drill, for example heavier than the Dewalt DC720, but it's also more powerful and includes the hammering feature. Since I use it around the house, I am not so concerned about its weight.

Close-up of the DC925 Rohm chuck

Overall a good drill that hope it will last many years. Can't wait to use it with some TapCon screws.